Initial Settings
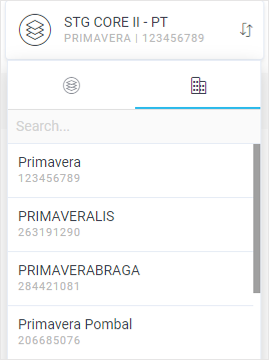
When you access the Invoicing Engine for the first time, a message is automatically sent to set up your company, however, you can later set it up. For a correct management of your company activity, you can associate more than one company on the same subscription. When configuring your company, you must validate an important data set for the correct system operation, namely, the company series. If you have data from another app, you can import them into this platform. The company setups are automatically filled in using the data provided while making the subscription payment, as well as using a VIES European database search. For this, you must validate the information filled in and the remaining fields. To create a company, follow these steps: Businesses are often organized in groups of companies that are related in some way. This group is called an organization, and it can be made of 1 or more companies. These companies share resources, from customers and suppliers to the same items, warehouses, etc. On the Invoicing Engine, there is only one table where the data is shared on all companies (customers, suppliers, items, currencies, countries, etc.). These tables with "master" data avoid duplicating the information, for each one of your companies. This way, besides streamlining the data insertion, all business processes that involve consolidating the data between companies of the same group (organization) are now much simpler and more intuitive for the manager. If you wish, you can add new companies to a subscription. You simply need to access the user menu, select the option Subscription and click Subscription Plans. After performing the payment, you must access Setup | General | Companies, click Create and fill in all the necessary data. After creating them, using the company selector, you can access the subscription (left tab) and the corresponding companies (right tab) you wish to work on: It is possible to import records for Payables, Receivables, Customers, Inventory, Items, SAF-T or Suppliers from another app. When you enter the software for the first time, a message will be presented on the dashboard granting direct access to the import area. Before importing a file, you must validate on the customer group the information you wish to change. Otherwise, the imported information will be the default and the changes must be performed manually. To import the files and view the import details, follow these steps: At the end of the process, an area titled Import Summary where you can track the import status. If you wish to delete the import performed, click Reverse. If an import is reversed, only the last data import performed will be deleted. That is, all entries up to the last previous import will be kept. Note: It is only possible to reverse data that hasn't already been used in documents or legal statements. When completed, the import date that might contain messages. To access the import details, click on the number of messages presented. The pop-up window organized the messages and/or warnings in several sections/categories. After viewing all the information, click Close to return to the previous screen. Once completed this process, you can associate the series to different document types on the system. The association process is similar for the different app documents, only the area of the app from which you can associate the document type is different: To associate a series to an invoice, follow these steps: Invoicing Engine is a system that supports multicurrency, that is, it is possible to create transactions in any of the currencies defined in Setup | General | Currencies. For that, you must save all monetary values in the original currency and on the company currency. Note: The company currency is defined when creating the company. Besides, it is also necessary to define the equivalence or conversion between the currencies defined by the transaction and company currency on the exchange rate table. To define a new exchange rate, follow these steps: The system automatically creates the reverse equivalence. On the entity file, in Setup | General | Companies, the corresponding contact list is divided in two types: Principal and Outros. Note: The main contact (principal) is always saved as 01. It is possible to establish types for additional contacts in order to, for example, divide the contact by department or personnel. To create a contact type, follow these steps: Please note that, to send the email, it is necessary to set up on the document type, the contact type that will be used to filter the message recipients.Configuring company
Adding new companies

Importing files
Importing files
Access Import Details
Step 1: Create a series
Note: By default, the data interval presented matches the fiscal year period;Step 2: Associate series to a document
Example – Associating to an invoice
Creating exchange rates
Creating contact types